
Learn how to use SecureCo Inbound Management Studios drag’n’drop workflow builder to configure a complex IVR service
Step 1.
After login, in Services, click Create New Service button.
Step 2.
In the Create New Service modal window, select the client account you wish from the drop-down menu. Next, select Enterprise Service and then click Confirm to continue.
Step 3.
You will now be presented with the Enterprise Service configuration page, which can be used to tailor your service requirements. The Start node is automatically placed on the navigator board and enables you to choose the number for the service.
Optionally, enable Call Recording, what you want the service to do in an emergency with Disaster Recovery and Time Zone.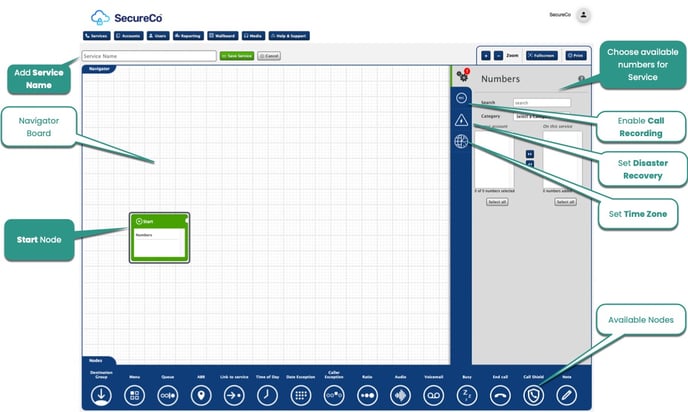
Available nodes are across the bottom of the screen and will be visible to select by pressing Nodes.
To add a node to the board, click on it, and once a node has been added to the drawing board, it can be configured in the window on the right by clicking on it.
To remove a node, select it and press delete. The settings in the right window will change depending on the node you are configuring.
Enterprise Service Nodes
Menu
This node allows you to set where to route the call dependent on the caller’s key press. For example, option 1 is for Sales, and option 2 is for Support. When added to the navigator board, the menu settings will display on the right.
Give the Menu a name and select the audio to be played to the caller on reaching the menu.
Enter the option descriptions in each option required and select the +. The menu names will update in the node, ready to be linked to the next action in your call flow.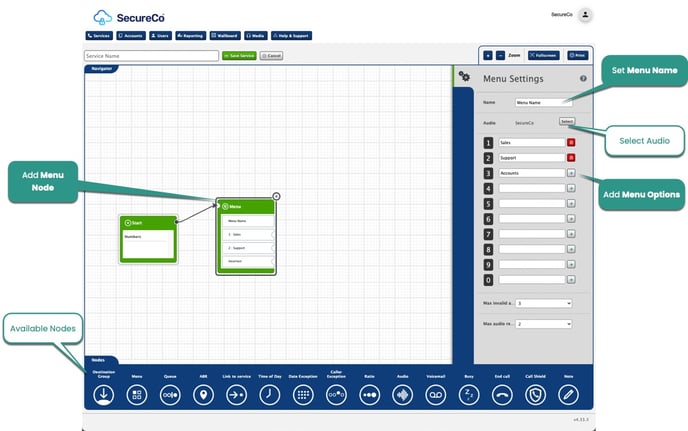
Destination Group
This node allows you to set where the call is to be terminated. Name the group and select the Call Type from Call in List Order, Call All at Once, Ratio Plan and Round Robin. A destination should be entered into the box, and select whether this is a Number or SIP, and if further destinations are to be added select the button ‘+ Add a New Destination’.
Choose whether to display the callers CLI or the number dialled, set the max calls limit (the amount of calls that can dial the service at one time) and select ring music. 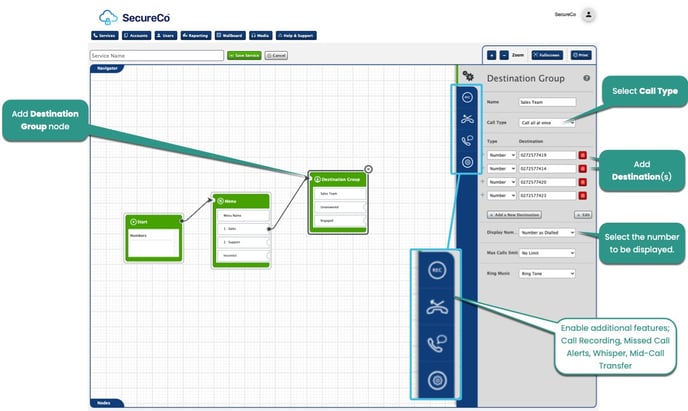
Additional features available to select are:
-
Call Recording Select the Call Recording tab to activate call recording on the service by turning the switch ON and set how the call recordings are to be retrieved.
- Missed Call Alert To be alerted by email of any missed calls, turn this on and enter an email address to receive the notifications. Multiple emails can be entered by selecting ‘+Add’
-
Whisper Settings When turned on an audio can be selected to play to the called party on receiving the call. Simply turn the switch to ON and upload your audio file from the media library.
- Mid Call Transfer allows the receiver of the call to transfer the call to another party. If chosen select whether Normal or agent. Failover is what happens if the outbound call fails. When turned ON this is added to the Node to set the next action.
QUEUE
This node will allow you to set up a queue on the service. A queue will hold the caller in the network, playing music and messages while trying to connect the caller to the termination number.
ABR (AREA-BASED ROUTING)
This node is used when callers are to be routed based on the geographical area they are calling from. A default action is automatically added to the node.
LINK TO SERVICE
This node is used to send a caller to another already existing service within the same account. Enter the service into the field.
TIME OF DAY
This node is used to send the call to different endpoints depending upon the time of day/day of the week. Name the schedule and select the clock and complete the days/times as required and select save. To add multiple TOD settings, select Add and name the schedule, select the clock and complete ensuring the days/times are not overlapping.
DATE EXCEPTION
This node is used to add date exceptions to the service. These are days/times when you require the service to do something other than the normal call routing, such as for a Public Holiday. These can be added as pre-set dates or custom. Pre-set contains preloaded bank holidays, select the required pre-set from the dropdown and select Add. To add a custom date, add a name to the customer box and select Add. The ability to set the date will now appear, select this and choose the date from the calendar. Additional date ranges can be added by selecting + Add Date Range
CALLER EXCEPTION
This node allows you to treat callers from specific numbers differently. This can block numbers from getting through to the service and instead play them a message (acting as a blacklist), or give certain callers priority and route them immediately to an advisor rather than entering a queue (acting as a whitelist). Enter a name for your list into the Group and select Add. Enter the CLI into the box and select Add, this will then appear in the larger window. Add numbers until your list is complete and press close.
RATIO
This node allows you to specify the percentage of calls to go down different paths. Enter the numbers totalling 100 into the boxes, for ratio splits of more than 2 select Add New Ratio until you have the required amount of ratio splits for the service
AUDIO
This node will allow you to play a pre-uploaded audio message at any point in the call flow. First select the audio to be played and then set the amount of times the audio should be played to a maximum of 10. Leave repeat OFF if the message is only to be played once.
VOICEMAIL
This node allows you to request the caller leaves a message. Select the Audio from the media library and then choose how to retrieve the emails by switching the features on. For email an email address should be entered, multiple can be added by selecting Add. Online playback will make the recordings available in the media library, set the time frame in which to delete the messages. For server, delivery enter the FTP/SFTP details for where the recordings should be delivered.
BUSY
This node can be placed anywhere at the end of a leg within a call flow and will return a busy signal to the caller.
END CALL
This node can be placed anywhere at the end of a leg within a call flow and will terminate the call.
NOTE
Notes can be added to the service as required.
Step 4.
Use the navigator at the top right of the page to navigate around your nodes. Once all of the nodes required have been added to the board, they will need to be connected together in order to route calls.
To connect a node, select it and hover over it until a black arrow appears. Click and hold and drag the connector to the module required, the connector and module will light green if this is a valid action. Simply drop the connector on the connecting node, and an arrow will appear in black, connecting the 2 nodes together. Continue connecting all nodes until the service is configured as you require.
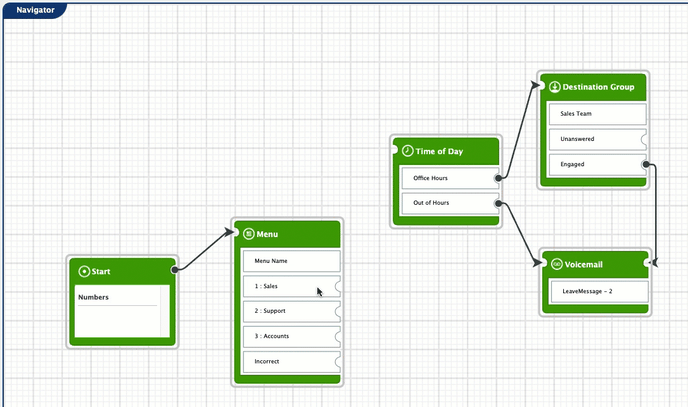
Connecting of the nodes can be completed as the nodes are added if preferred
Step 5.
Once you are satisfied that the configuration is correct, click Save Service, and the service will be made live.